The BEST Philadelphia-Style No-Bake Cheesecake Bars
recipe.yield: 16 bars
recipe.prepTime: 25 minutes (plus crust setting time)
recipe.chillTime: 6 hours (minimum) or overnight
recipe.totalTime: 6 hours 25 minutes+
recipe.difficulty: Easy
recipe.intensity: Low (Minimal active effort, mostly chilling time)
recipe.category: Dessert, No-Bake
recipe.cuisine: American
The Ultimate No-Fuss Cheesecake Experience
The quest for the perfect, foolproof cheesecake ends here. These are The BEST Philadelphia Cheesecake Bars—a name earned through their flawless texture, quintessential creamy-tangy flavor, and incredible versatility. Unlike their fussy, bake-in-a-water-bath cousins, these bars are a celebration of simplicity and reliability, achieving a velvety-smooth, rich filling without ever turning on your oven. By using the iconic Philadelphia cream cheese and a clever stabilizing technique, we create a dessert that’s luxuriously dense yet impossibly light, all nestled atop a buttery, press-in graham cracker crust. They slice cleanly, hold their shape perfectly, and can be endlessly customized with your favorite toppings. This is the cheesecake you confidently bring to any gathering, promising (and delivering) legendary results every single time.
Ingredients
For the Graham Cracker Crust:
-
2 cups (about 200g) graham cracker crumbs (from 14-16 full sheets)
-
⅓ cup (67g) granulated sugar
-
¼ teaspoon fine sea salt
-
½ cup (113g) unsalted butter, melted
For the Philadelphia Cheesecake Filling:
-
3 (8 oz) blocks (total 680g) Philadelphia brand full-fat cream cheese, softened to room temperature
-
1 ¼ cups (150g) powdered sugar, sifted
-
2 teaspoons pure vanilla extract
-
1 tablespoon fresh lemon juice
-
¼ teaspoon fine sea salt
-
2 ¼ cups (540ml) cold heavy whipping cream, divided
For the Stabilized Whipped Cream Topping (Optional):
-
1 cup (240ml) cold heavy whipping cream
-
2 tablespoons powdered sugar
-
½ teaspoon vanilla extract
Equipment
-
9×9-inch square baking pan (metal or glass)
-
Parchment paper
-
Stand mixer or hand mixer
-
Large mixing bowls (2)
-
Whisk and rubber spatula
-
Measuring cups and spoons
Instructions
Step 1: Prepare the Pan & Make the Crust
-
Line the Pan: Line your 9×9-inch pan with parchment paper, leaving an overhang on two opposite sides. This “sling” will allow you to lift the entire set cheesecake out for clean, easy slicing.
-
Make Crumbs: If starting from whole crackers, pulse them in a food processor until you have fine, even crumbs. You can also place them in a sealed zip-top bag and crush with a rolling pin.
-
Mix Crust: In a medium bowl, combine the 2 cups graham cracker crumbs, ⅓ cup granulated sugar, and ¼ teaspoon salt. Pour the ½ cup melted butter over the mixture and stir with a fork until all the crumbs are uniformly moistened and the mixture resembles wet sand.
-
Press & Set: Pour the crumb mixture into your prepared pan. Use the bottom of a flat measuring cup or glass to press it firmly and evenly into a compact layer across the bottom. For a neater edge, press the crumbs slightly up the sides. Place the pan in the freezer for 15-20 minutes to set solid while you make the filling.
Step 2: Create the Luxurious No-Bake Filling
-
Whip the Stabilizing Cream: This is the secret to perfect sliceable bars. In the bowl of a stand mixer fitted with the whisk attachment (or using a hand mixer), pour in 1 cup (240ml) of the cold heavy cream. Whip on medium-high speed until stiff peaks form—this means the cream stands straight up when you lift the whisk. Transfer this whipped cream to another bowl and set aside. No need to clean the mixer bowl.
-
Beat the Cream Cheese Base: In the same mixer bowl (now with the paddle attachment if using a stand mixer), beat the 3 blocks of softened cream cheese on medium speed for 2 full minutes, until completely smooth, creamy, and free of any lumps. Scrape down the bowl and beater.
-
Add Sweeteners & Flavor: With the mixer on low, gradually add the sifted 1 ¼ cups powdered sugar, 2 teaspoons vanilla, 1 tablespoon lemon juice, and ¼ teaspoon salt. Beat until fully combined, then scrape down the bowl again and beat for another 30 seconds to ensure homogeneity.
-
Fold & Lighten: Using your rubber spatula, gently fold the reserved whipped cream into the cream cheese mixture in two additions. Fold until no white streaks remain. This step lightens the base dramatically.
-
Incorporate Liquid Cream: In a slow, steady stream with the mixer on low speed, pour in the remaining 1 ¼ cups (300ml) of cold, liquid heavy cream. Mix just until the batter is uniform, smooth, and thickened slightly—about 30-45 seconds. Do not overmix.
Step 3: Assemble & The Crucial Chill
-
Pour & Spread: Retrieve the pan with the set crust from the freezer. Pour the luxurious cheesecake filling over the crust. Use an offset spatula or the back of a spoon to spread it into an perfectly smooth, even layer.
-
The Long Chill: Cover the pan tightly with plastic wrap. Refrigerate for a minimum of 6 hours, but ideally overnight (8-12 hours). This extended chill is non-negotiable. It allows the filling to set firmly, the flavors to meld beautifully, and ensures you get clean, sharp slices.
Step 4: Final Touches & Serving
-
Unmold: Use the parchment paper sling to carefully lift the entire cheesecake block out of the pan and onto a cutting board.
-
Make Topping (Optional): For the optional stabilized whipped cream layer, whip the 1 cup cold cream with 2 tablespoons powdered sugar and ½ teaspoon vanilla until medium-stiff peaks form. Spread evenly over the top of the chilled cheesecake.
-
Slice: For pristine bars, wipe a long, sharp knife clean with a hot, damp cloth between each cut. Cut into 16 squares (4 rows by 4 rows).
-
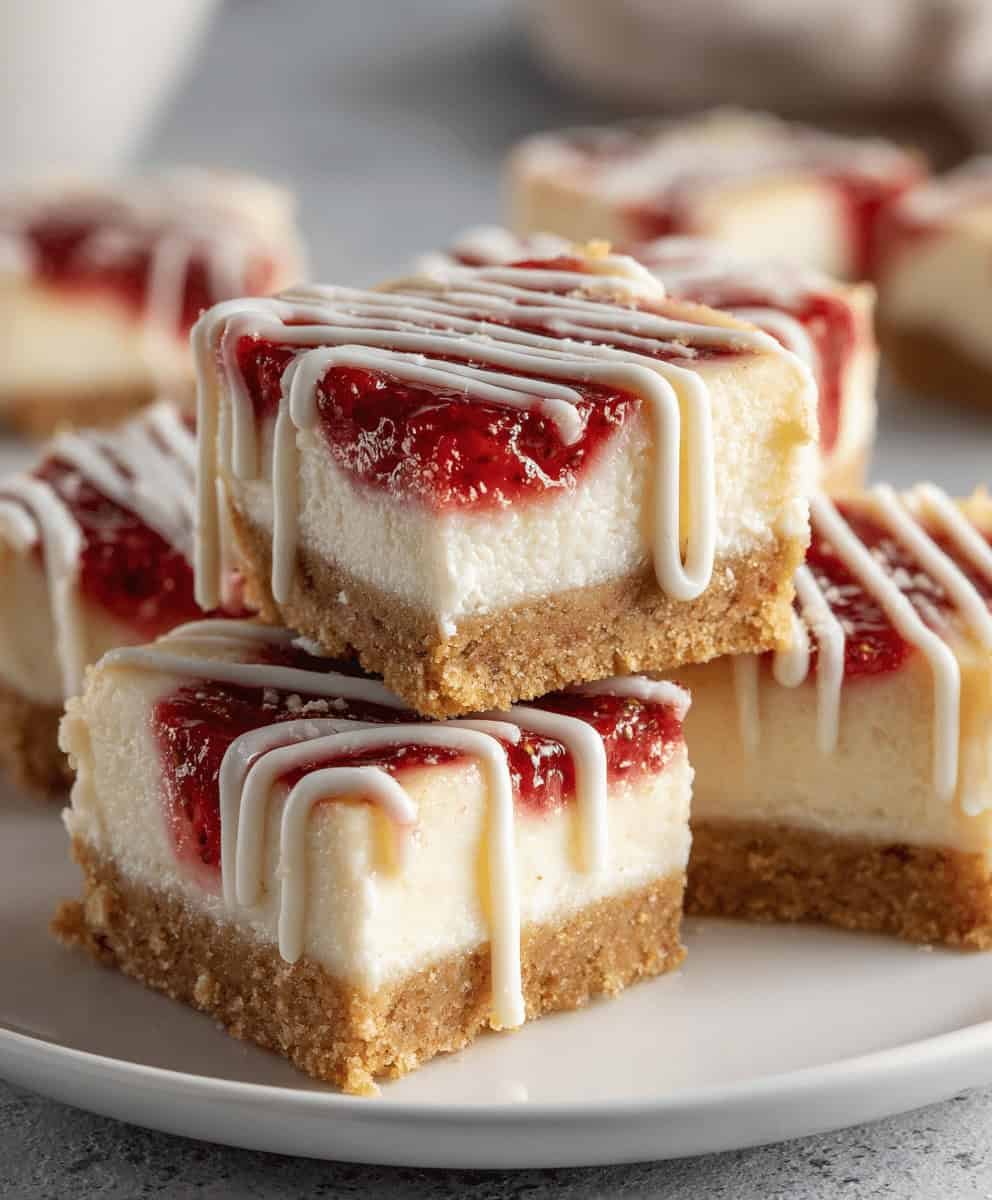
Serve & Garnish: Serve immediately. Bars can be garnished just before serving with fresh berries, a drizzle of fruit sauce, chocolate shavings, or a sprinkle of graham cracker crumbs.
The “BEST” Secrets & Pro-Tips
-
Philadelphia is Key: The specific brand and full-fat block style are crucial for structure and authentic flavor. Do not use whipped, spreadable, or reduced-fat cream cheese.
-
Room Temperature Cream Cheese: This cannot be overstated. Leave the blocks on the counter for 2-3 hours until they yield to gentle pressure. Cold cheese will result in a lumpy filling.
-
The Double Cream Method: Whipping part of the cream first and folding it in stabilizes the filling without gelatin, giving it body and a mousse-like texture while the liquid cream ensures ultimate creaminess.
-
Clean Slices: For picture-perfect bars, chill the entire cheesecake block (uncovered) for 15 minutes in the freezer after the long refrigerator chill, just before cutting.
-
Flavor Variations: Add 2 tablespoons of lemon zest for a bright twist, or swirl in ½ cup of fruit preserves before chilling. For chocolate, fold in 1 cup of finely chopped chocolate or replace ¼ cup of powdered sugar with cocoa powder.
Storage Information
Store bars in a single layer in an airtight container in the refrigerator for up to 5 days. They can also be frozen solid on a parchment-lined tray, then transferred to a freezer bag for up to 2 months. Thaw in the refrigerator overnight before serving.
Nutrition Information
-
recipe.servingSize: 1 bar (1/16 of recipe, without optional topping)
-
recipe.calories: 420
-
recipe.carbohydrateContent: 27g
-
recipe.proteinContent: 5g
-
recipe.fatContent: 34g
-
recipe.saturatedFatContent: 21g
-
recipe.cholesterolContent: 105mg
-
recipe.sodiumContent: 260mg
-
recipe.fiberContent: 0.5g
-
recipe.sugarContent: 20g
Nutritional information is an estimate based on specific ingredients and brands used. Values will vary with customizations and optional toppings.
These truly are The BEST Philadelphia Cheesecake Bars: a no-bake masterpiece of contrasting textures and pure, creamy indulgence. They offer the iconic flavor of a classic cheesecake with the effortless ease of a refrigerator dessert, guaranteeing a flawless result that will make you a dessert legend.