Total Time: 24-30 hours (Active: 45 minutes | Inactive: 23-29+ hours)
Difficulty: Medium (Requires an active sourdough starter)
Yield: 1 large, stunning loaf
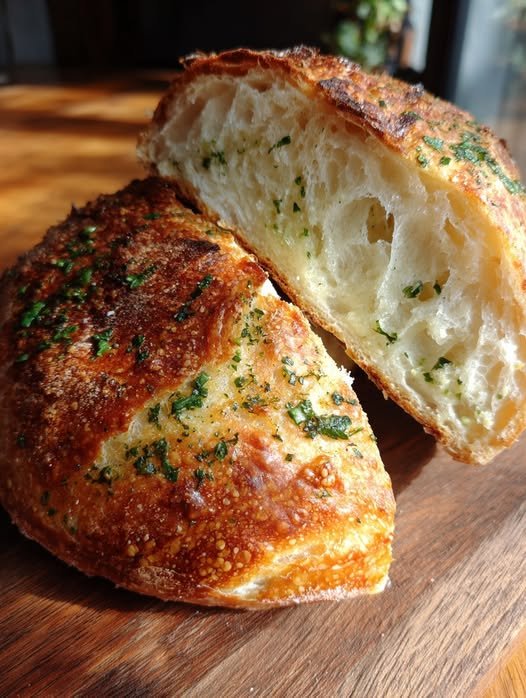
This Garlic & Herb Sourdough Bread is the pinnacle of artisan home baking. A beautiful, crackling-crust, open-crumb sourdough loaf is infused with the aromatic warmth of roasted garlic and fresh herbs in every bite. This recipe guides you through the slow, rewarding process of fermentation, resulting in a deeply flavorful, tangy, and fragrant loaf that fills your kitchen with an unforgettable aroma. It’s a project of love, patience, and incredible edible rewards.
Ingredients
For the Roasted Garlic & Herb Mix:
-
1 full head of garlic
-
1 teaspoon olive oil
-
¼ cup (15g) finely chopped fresh herbs (a robust blend of rosemary, thyme, and parsley is ideal)
-
1 tablespoon (14g) unsalted butter, softened
For the Sourdough Bread:
-
50g (¼ cup) active, bubbly sourdough starter (100% hydration)*
-
350g (1 ½ cups) warm water (about 85°F/30°C)
-
500g (4 cups + 2 tbsp) bread flour** (high-protein, such as King Arthur)
-
10g (1 ¾ tsp) fine sea salt
-
Rice flour, for dusting
*Your starter should be at its peak, having doubled in size 4-8 hours after its last feeding, and pass the float test (a spoonful drops in water floats).*
**Bread flour is recommended for superior oven spring and open crumb. All-purpose can be used for a slightly denser crumb.
Equipment
-
Kitchen scale (non-negotiable for accuracy)
-
Large mixing bowl or dough tub
-
Bench scraper
-
Banneton (proofing basket) or a bowl lined with a heavily floured kitchen towel
-
Dutch oven with lid
-
Parchment paper
-
Small ramekin or foil for roasting garlic
Instructions
Phase 1: Prep & Roast Garlic (Time: 45 minutes, can be done ahead | Intensity: Low)
-
Roast Garlic: Preheat oven to 400°F (200°C). Slice the top off the head of garlic to expose the cloves. Place on foil, drizzle with olive oil, wrap tightly, and roast for 35-40 minutes until cloves are soft, golden, and fragrant. Let cool.
-
Make Herb Butter: Squeeze the roasted garlic cloves into a small bowl. Mash with the softened butter and chopped fresh herbs until a paste forms. Set aside.
Phase 2: Mix & Autolyse (Time: 30 minutes + 1 hour rest | Intensity: Low)
-
Mix Dough: In your large bowl, combine the warm water and active sourdough starter with a fork or whisk until milky. Add all the bread flour. Mix with your hands or a spatula until no dry bits remain. The dough will be shaggy and sticky.
-
Autolyse (Rest): Cover the bowl with a damp towel or plastic wrap and let it rest for 1 hour. This allows the flour to fully hydrate, developing gluten structure with minimal effort.
Phase 3: Incorporate Salt & Add-Ins (Time: 15 minutes | Intensity: Medium)
-
Add Salt: After the hour, sprinkle the salt over the dough. Add 1 tablespoon of warm water to help it incorporate.
-
Pinch and Fold: Using wet hands, pinch and fold the dough in the bowl, turning the bowl as you go, for about 2-3 minutes until the salt is fully dissolved and integrated. The dough will become more cohesive.
-
Laminate & Add Garlic Herb Paste: Lightly wet your countertop (to prevent sticking). Gently pour the dough onto the surface. Using wet hands, stretch the dough into a large, thin rectangle (about ½ inch thick). Spread the roasted garlic-herb paste evenly over the surface.
-
Envelope Fold: Fold the dough into an envelope: top third down, bottom third up, left side over, right side over. This layers the flavor inside. Place the dough back in the bowl, seam-side down. Cover.
Phase 4: Bulk Fermentation & Coil Folds (Time: 4-6 hours | Intensity: Low)
-
Bulk Ferment: Let the dough rise at room temperature (70-75°F / 21-24°C is ideal). This is the bulk fermentation.
-
Coil Folds: Perform 4-6 sets of “coil folds” spaced 30-45 minutes apart during the first 2-3 hours. To coil fold: wet your hands, reach under one side of the dough in the bowl, lift it up, and fold it over itself. Rotate the bowl 90 degrees and repeat until you’ve gone around 4 times. This builds incredible strength without degassing the dough.
-
Watch for Rise: The dough is ready for shaping when it has increased in volume by 50-75%, is bubbly on top and sides, and feels aerated and jiggly. Time varies wildly with starter strength and room temp. Do not rush this.
Phase 5: Shape & Cold Proof (Time: 20 minutes + 12-16 hours | Intensity: Medium)
-
Pre-Shape: Lightly flour your work surface. Gently turn the dough out. Using a bench scraper, form it into a loose round. Let it rest, uncovered, for 20 minutes (the “bench rest”).
-
Final Shape: Dust the top of the dough lightly with flour. Flip it over so the smooth side is down. Gently stretch into a rectangle, then fold like a business letter: top third down, bottom third up. Then, roll from the top down into a tight log, sealing the seam with the heel of your hand. Create surface tension by pulling it towards you on the counter.
-
Place in Banneton: Heavily dust your banneton or towel-lined bowl with a 50/50 mix of rice flour and all-purpose flour. Place the dough seam-side UP in the basket.
-
Cold Proof: Cover the basket with a reusable bag or plastic wrap. Place in the refrigerator for 12-16 hours (overnight). This slow fermentation deepens flavor and improves oven spring.
Phase 6: Bake (Time: 1 hour | Intensity: Medium)
-
Preheat: At least 30 minutes before baking, place your Dutch oven (with lid on) in your oven and preheat to 500°F (260°C).
-
Score: Remove your dough from the fridge. Place a sheet of parchment paper over the banneton, flip it over, and gently lower the dough onto the paper. Using a sharp lame or razor blade, score the top with one confident, deep slash (or a pattern). This controls expansion.
-
Bake Covered: Carefully remove the screaming-hot Dutch oven. Using the parchment as a sling, lower the dough into it. Put the lid back on. Reduce oven to 450°F (230°C) and bake for 25 minutes.
-
Bake Uncovered: Remove the lid. The loaf should be pale and have sprung. Bake uncovered for another 20-25 minutes until the crust is a deep, glorious chestnut brown and sounds hollow when tapped.
-
Cool: Transfer the loaf to a wire rack. Let it cool completely for at least 4 hours before slicing. The interior is still cooking, and cutting too soon releases steam, ruining the texture.
Nutritional Information (Per slice, based on 16 slices)
-
Calories: ~145 kcal
-
Total Fat: 1g
-
Cholesterol: <1mg
-
Sodium: 245mg
-
Total Carbohydrates: 29g
-
Dietary Fiber: 1g
-
Sugars: <1g
-
-
Protein: 5g
Note: Nutritional information is an estimate. The fermentation process makes the bread more digestible and may alter the glycemic impact compared to commercial bread.
The Last Slice: A Treatise on Time, Flavor, & Mastery
Serving Suggestion:
This bread is a star on its own, best enjoyed simply. Tear off a piece and savor it with high-quality olive oil, flaky sea salt, or a smear of soft cheese. It makes transcendent toast, unbeatable sandwiches (especially with roasted meats and mustard), and the finest garlic bread base imaginable.
Storage:
-
Short-Term: Store at room temperature in a paper bag or bread box for up to 3 days. The crust will soften but can be re-crisped in a 350°F oven for 5 minutes.
-
Long-Term: Once completely cool, slice and freeze in a freezer bag for up to 3 months. Toast slices directly from frozen.
The Sourdough Philosophy: This Isn’t Just a Recipe, It’s a Process.
This bread teaches you to read dough, not a clock. The times are guidelines. Success lies in observing:
-
Starter Health: Your starter must be vigorous. A weak starter = a dense loaf.
-
Dough Development: The “windowpane test” is less critical than the dough’s feel—it should be strong, elastic, and alive with bubbles.
-
Temperature is King: A cool kitchen extends fermentation; a warm one accelerates it. Your dough’s behavior is your true guide.
Troubleshooting & Pro Insights:
-
Dense Loaf/No Oven Spring:
-
Cause: Under-proofed (most common), weak starter, or poor shaping (lost surface tension).
-
Fix: Extend bulk fermentation. Perform the “poke test”: after cold proof, poke the dough. If it springs back slowly and leaves a slight indent, it’s ready. If it springs back quickly, it needs more time at room temp.
-
-
Flat, Spread-Out Loaf:
-
Cause: Over-proofed.
-
Fix: Shorten bulk fermentation or cold proof time next time.
-
-
Pale, Soft Crust:
-
Cause: Insufficient heat/steam.
-
Fix: Ensure Dutch oven is preheated for a full 45 minutes. The initial steam created by the covered bake is essential for crust development and oven spring.
-
-
Herbs Turning Dark/Green:
-
This is normal. The chlorophyll in fresh herbs can react with the acids in sourdough, sometimes causing a slight blue/gray hue. It does not affect flavor.
-
Flavor Variations:
-
Sun-Dried Tomato & Kalamata: Add ⅓ cup chopped, oil-packed sun-dried tomatoes and ¼ cup chopped kalamata olives with the herb paste.
-
Everything Bagel: Roll the shaped loaf in an “everything” seasoning mix before the final proof.
-
Cheddar & Jalapeño: Add 1 cup grated sharp cheddar and ¼ cup finely diced pickled jalapeños during lamination.
This Garlic & Herb Sourdough Bread is a journey. It connects you to the oldest form of baking, where time, microbes, and your own hands conspire to create something alive and profoundly nourishing. The reward is not just a loaf, but the skill, patience, and deep satisfaction that comes with it.