-
Prep Time: 25 minutes
-
Chill Time: 4 hours (minimum) or overnight
-
Total Time: 4 hours 25 minutes (largely inactive)
-
Intensity: Easy – This is a beginner-friendly, no-bake recipe that involves simple mixing and layering. No advanced techniques or special equipment are required.
Equipment You’ll Need
-
9×13 inch baking dish or casserole pan
-
Electric hand mixer or stand mixer
-
Medium and large mixing bowls
-
Spatula
-
Measuring cups and spoons
Ingredients
For the Crust:
-
2 cups all-purpose flour
-
1 cup (2 sticks / 226g) cold unsalted butter, cubed
-
1 cup finely chopped pecans or walnuts
-
2 tablespoons granulated sugar
For the Cream Cheese Layer:
-
2 (8 oz) blocks full-fat cream cheese, softened to room temperature
-
1 cup (2 sticks / 226g) unsalted butter, softened to room temperature
-
2 cups powdered sugar, sifted
-
1 teaspoon vanilla extract
-
1 (8 oz) container frozen whipped topping (like Cool Whip), thawed OR 2 cups of freshly whipped heavy cream
For the Topping:
-
2 (21 oz) cans cherry pie filling
-
Optional garnish: Additional whipped topping and whole pecans
Instructions
Step 1: Create the Buttery Pecan Crust
-
Preheat and Prep: Begin by preheating your oven to 350°F (175°C). This crust is the only part that requires baking, and it provides a essential sturdy, crunchy base for the dessert.
-
Combine Crust Ingredients: In a large bowl, combine the flour, 1 cup of cold, cubed butter, chopped pecans, and 2 tablespoons of granulated sugar. Using a pastry cutter, a fork, or your clean fingertips, work the mixture together until it resembles coarse, sandy crumbs and the butter is well incorporated.
-
Press and Bake: Transfer the crust mixture into your ungreased 9×13 inch baking dish. Press it down firmly and evenly into the bottom of the pan to create a compact base.
-
Bake to Golden Brown: Place the pan in the preheated oven and bake for 20-25 minutes, or until the entire crust is a light golden brown. The nuts will become fragrant, filling your kitchen with a warm, toasty aroma.
-
Cool Completely: Once baked, remove the crust from the oven and place the entire pan on a wire cooling rack. It is absolutely essential that you allow the crust to cool completely to room temperature before proceeding. Adding the cream layer to a warm crust will cause it to melt and become a runny mess.
Step 2: Whip Up the Snowy Cream Layer
-
Cream the Base: In the bowl of a stand mixer fitted with the paddle attachment (or using a hand mixer in a large bowl), combine the softened cream cheese and the 1 cup of softened butter. Beat on medium-high speed for 2-3 minutes, until the mixture is completely smooth, pale, and free of any lumps. Scrape down the bowl and beater thoroughly. This initial step is crucial for a silky texture.
-
Incorporate Sweetness: Reduce the mixer speed to low and gradually add the sifted powdered sugar. Once incorporated, add the vanilla extract. Increase the speed to medium-high and beat for another 1-2 minutes until the mixture is light and fluffy.
-
Fold in the Whipped Topping: If you are using the frozen whipped topping, gently fold it into the cream cheese mixture using a spatula until no white streaks remain. If you are using freshly whipped cream, ensure it is whipped to stiff peaks before gently folding it in. This step introduces air and lightness, transforming the dense cream cheese mixture into a fluffy, “snowy” cloud.
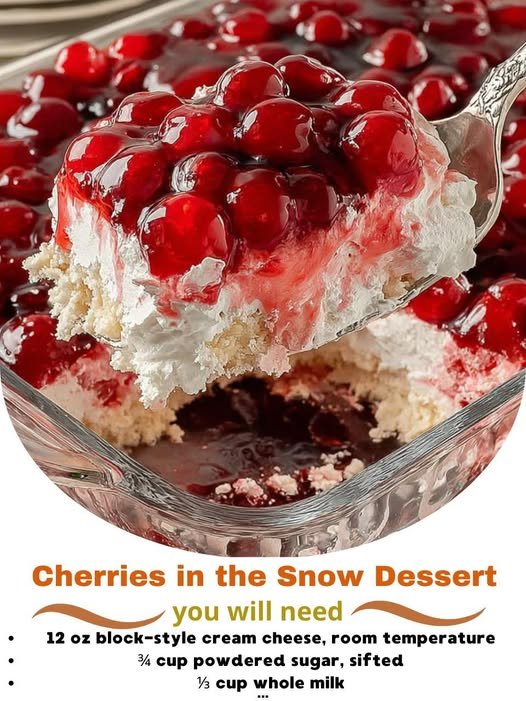
Step 3: Assemble the Dessert
-
Spread the Cream Layer: Once the crust is completely cool, spread the fluffy cream cheese mixture evenly over the top. Use your spatula to smooth it into a beautiful, pristine white layer.
-
Chill to Set: Cover the pan with plastic wrap and refrigerate for at least 4 hours, but preferably overnight. This chilling time is non-negotiable as it allows the cream layer to firm up, making it sliceable and allowing the flavors to meld perfectly.
Step 4: The Grand Finale – The Cherries
-
Top and Serve: Just before you are ready to serve, open the cans of cherry pie filling. Spoon the cherries and their glossy sauce evenly over the entire surface of the chilled white cream layer.
-
Garnish (Optional): For an extra touch of elegance, you can pipe rosettes of additional whipped topping around the edges and garnish with a few whole pecans.
-
Slice and Enjoy: Use a sharp knife to slice into squares. Wipe the knife clean between cuts for the neatest presentation. Serve immediately and watch it disappear.
The Last of the Recipe: Storage & Reheating
-
Storing Leftovers: This dessert must be stored, covered tightly with plastic wrap or in an airtight container, in the refrigerator. It will keep beautifully for 3-4 days. Note that the crust will gradually soften the longer it sits, but it will still be delicious.
-
Freezing: It is possible to freeze this dessert, but with some textural changes. Freeze the assembled dessert (without the cherry topping) for up to 1 month. Add the cherry topping after it has thawed overnight in the refrigerator. The cream cheese layer may release a small amount of water upon thawing, but the flavor will remain intact.
-
Reheating: This is a chilled dessert and is not meant to be reheated.
Nutrition Information
Please note: The following nutrition information is an estimate provided by an online nutrition calculator. Actual values may vary based on specific ingredients and brands used.
-
Serving Size: 1/12th of the recipe
-
Calories: ~685 kcal
-
Total Fat: 45g
-
Saturated Fat: 25g
-
Cholesterol: 105mg
-
Sodium: 150mg
-
Total Carbohydrates: 68g
-
Dietary Fiber: 2g
-
Sugars: 45g
-
Protein: 6g
Chef’s Notes & Customizations
-
Room Temperature is Key: Ensuring your cream cheese and butter are truly softened to room temperature is the secret to a smooth, lump-free cream layer. Taking them out of the fridge an hour before you start is ideal.
-
The Cool Crust: Patience is a virtue here. Rushing the cooling process for the crust will compromise the entire structure of the dessert.
-
Flavor Twists:
-
Other Fruit Toppings: While cherry is classic, this dessert is a fantastic canvas for other pie fillings. Blueberry, apple, or peach pie filling are all wonderful alternatives.
-
Lemon Zest: Add the zest of one lemon to the cream cheese mixture for a bright, zesty note that cuts through the sweetness.
-
Different Nuts: Use walnuts or almonds in place of the pecans for a different flavor profile. For a nut-free version, simply omit the nuts from the crust—it will still be deliciously buttery.
-
Graham Cracker Crust: For a quicker, no-bake option, you can substitute the baked crust with a classic graham cracker crust (3 cups crumbs, 1/3 cup sugar, 3/4 cup melted butter, pressed and chilled).
-