Yield: 12-14 Taquitos
Active Time: 35 minutes
Cook Time: 25 minutes
Total Time: 1 hour
Difficulty: Intermediate
Intensity: Medium-High (requires precise timing and handling of hot melted cheese)
Ingredients
For the Cheese “Tortilla” Shells:
-
3 cups (12 oz / 340g) pre-shredded Mexican cheese blend
-
1 ½ cups (6 oz / 170g) pre-shredded mozzarella cheese
-
Critical Note: Use pre-shredded cheese containing anti-caking agents like cellulose. This is essential, as it helps the cheese melt into a cohesive, flexible “shell” rather than a greasy puddle. Do not use fresh-grated block cheese for this step.
For the Chicken Filling:
-
1 lb (450g) boneless, skinless chicken breasts
-
1 tbsp olive oil
-
1 tsp chili powder
-
1 tsp ground cumin
-
½ tsp garlic powder
-
½ tsp onion powder
-
½ tsp salt
-
¼ tsp black pepper
-
½ cup (4 oz) salsa verde (or red salsa)
-
4 oz (½ block) cream cheese, softened
-
2 tbsp chopped fresh cilantro
For Frying & Serving (Optional):
-
High smoke-point oil for frying (avocado, peanut, or canola)
-
For serving: guacamole, sour cream, pico de gallo, extra salsa
Instructions
Stage 1: Prepare the Filling (Time: 20 minutes, Medium-Low Intensity)
-
Season & Cook Chicken: Pat chicken breasts dry. Rub with olive oil and season evenly on both sides with chili powder, cumin, garlic powder, onion powder, salt, and pepper. Heat a skillet over medium-high heat. Cook chicken for 6-7 minutes per side, or until cooked through (internal temp 165°F / 74°C). Transfer to a plate to rest.
-
Shred & Mix: Once slightly cooled, shred the chicken using two forks or a stand mixer. In a medium bowl, combine the hot shredded chicken, salsa verde, softened cream cheese, and chopped cilantro. Mix thoroughly until the cream cheese is fully melted and incorporated, creating a creamy, cohesive filling. Taste and adjust seasoning. Set aside to cool slightly.
Stage 2: Form the Cheese Shells (Time: 15 minutes, High-Intensity Focus)
-
Prep Workstation: Line a large baking sheet with parchment paper. Have a second sheet of parchment and a rolling pin or glass ready. Mix the two types of pre-shredded cheese together in a bowl for even distribution.
-
Melt the Cheese “Tortillas”: For each taquito shell, sprinkle a heaping ¼ cup of the cheese blend into a 5-6 inch circle on a cold, non-stick skillet or griddle. Do not crowd the pan; work in batches of 2-3.
-
Cook to Perfection: Place the skillet over medium-low heat. Let the cheese melt slowly, without stirring, until it becomes a bubbling, unified, lacy disc. This takes 2-3 minutes. The edges will just start to turn golden. The key is a slow, even melt.
-
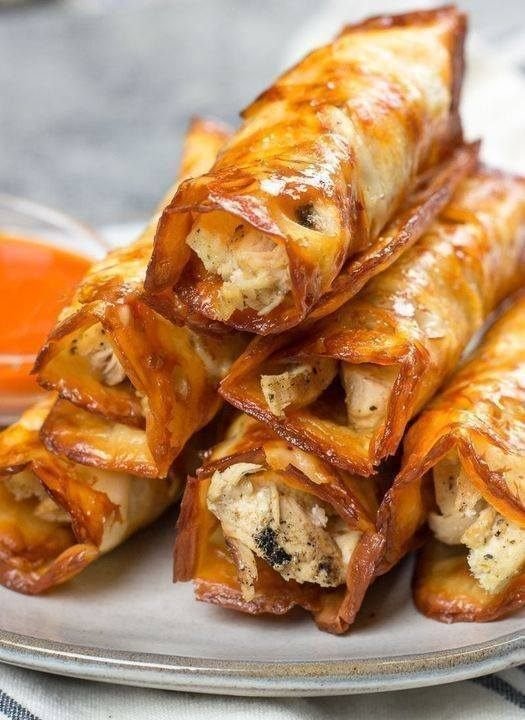
The Transfer & Shape: As soon as the cheese disc is fully melted but still pale, remove the pan from heat. Let it sit for 30 seconds to firm up slightly. Carefully slide a thin spatula under one edge to loosen. Working quickly but gently, transfer the warm, pliable cheese disc to the parchment-lined baking sheet. Immediately place the second sheet of parchment on top and gently roll over it with a rolling pin or glass to press it into a uniform, thin, round “tortilla.” Repeat to make 12-14 cheese shells, stacking them with parchment between each. Let them cool completely; they will become firm and leathery.
Stage 3: Fill, Roll & Cook (Time: 15 minutes, Medium-High Heat Intensity)
-
Assemble: Place a cooled cheese shell on a clean surface. Spoon 2-3 tablespoons of the chicken filling in a line slightly below the center. Gently but firmly roll the cheese shell around the filling. The residual oils in the cheese will act as glue; press the seam gently to seal. Repeat with all shells.
-
Pan-Fry (Preferred Method): Heat ¼ inch of oil in a large skillet over medium-high heat (350°F / 175°C). Working in batches, carefully place the taquitos seam-side down in the hot oil. Fry for 1-2 minutes per side, until the cheese shell is deep golden brown and extra crispy. Drain on a wire rack set over a baking sheet. Do not use paper towels, as they will trap steam and make the shells soggy.
-
Bake Option (Less Crispy): For a lighter version, preheat oven to 400°F (200°C). Place taquitos on a wire rack set over a baking sheet. Lightly spray with oil. Bake for 10-12 minutes until golden and crisp.
Nutrition Information
(Per taquito, based on 12 taquitos, pan-fried method)
-
Calories: ~210 kcal
-
Total Fat: 15g
-
Saturated Fat: 8g
-
Cholesterol: 55mg
-
Sodium: 380mg
-
Total Carbohydrates: 2g
-
Dietary Fiber: 0g
-
Sugars: 1g
-
Protein: 16g
-
Net Carbs: ~2g
Nutrition Disclaimer: Values are estimates. Using pre-shredded cheese and pan-frying contributes to the fat content. Baking will slightly reduce fat. The primary carbohydrate comes from the small amount of salsa and cream cheese in the filling.
The Last Bite & Mastery of the Cheese Shell
The Last Taquito: The final piece, savored after the crowd has gone, holds a secret. By this point, the remaining filling has settled, the cheese shell has reached its peak crispness at room temperature, and the flavors have fully married. It’s a richer, more concentrated bite—the cook’s quiet reward.
Serve & Store:
-
Serving: Serve immediately while the cheese shell is at its crispiest. Provide ample dipping stations: cool sour cream, chunky guacamole, and a vibrant pico de gallo are essential to cut the richness.
-
Storage: These are best enjoyed fresh. However, you can store cooled taquitos in an airtight container in the refrigerator for up to 2 days.
-
Reheating: To preserve crispness, never microwave. Reheat in an air fryer or oven at 375°F (190°C) for 5-8 minutes until hot and re-crisped.
The Science of Success – Pro-Tips:
-
The Cheese is the Law: Pre-shredded cheese with anti-caking agents is non-negotiable. The cellulose prevents the fats and proteins from fully separating, creating the flexible, strong “shell” you need. Fresh-grated cheese will result in a greasy, broken mess.
-
Low and Slow for the Shell: High heat will burn the cheese before it melts into a unified disc. Medium-low heat is mandatory for a successful, pliable shell.
-
Cool Completely Before Filling: The cheese discs must transition from pliable to leathery. If you try to roll them while warm, they will tear. Patience here ensures structural integrity.
-
The Wire Rack is Key: Draining fried foods on a wire rack is the single greatest trick for maintaining crunch. It allows air to circulate, preventing sogginess from trapped steam.
-
Filling Variations: The chicken filling is a blueprint. Swap in shredded beef barbacoa, sautéed shrimp, or seasoned black beans for a vegetarian option. The cheese shell is your versatile vessel.
This recipe is a technique that unlocks a new world of low-carb, gluten-free possibilities. It’s a stunning demonstration of how one ingredient, handled with knowledge and care, can become something utterly transformative.