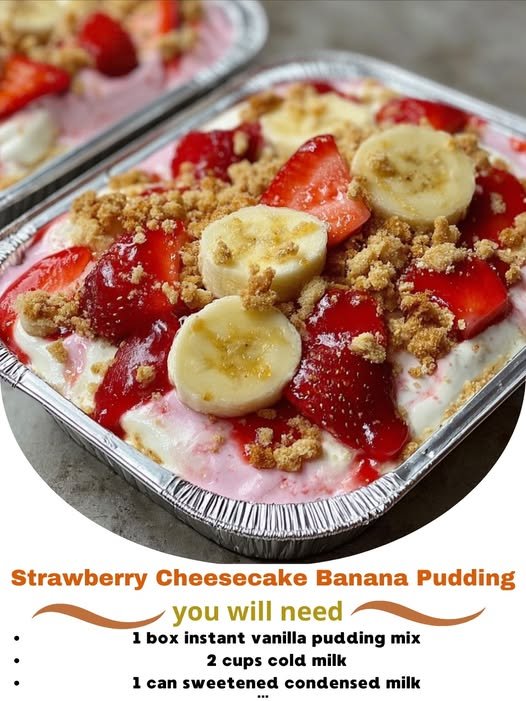
Name: Strawberry Cheesecake Banana Pudding
Total Time: 4 hours 30 minutes (Active: 30 mins, Chilling: 4+ hours)
Servings: 12
Difficulty: Easy
Dietary Tags: No-Bake Dessert, Make-Ahead, Southern-Inspired Fusion
Introduction
Prepare to experience a legendary fusion of two beloved desserts with this Strawberry Cheesecake Banana Pudding. This recipe marries the creamy, dreamy layers of classic Southern banana pudding with the bright, tangy richness of New York-style strawberry cheesecake. Imagine layers of vanilla wafers, fresh banana slices, and sweet macerated strawberries, all enveloped in a luscious, no-bake cheesecake filling that’s impossibly light yet decadently rich. Topped with a cloud of freshly whipped cream and a garnish of more strawberries, this dessert is a show-stopping masterpiece that requires no oven and improves as it chills. Perfect for potlucks, holidays, or any gathering where you want to impress with minimal effort, this pudding is a symphony of textures and flavors that will have everyone begging for the recipe.
Equipment Needed
-
Large trifle dish, large glass bowl, or 9×13 inch baking dish
-
Stand mixer or large bowl with a hand mixer
-
Medium mixing bowls (2)
-
Rubber spatula
-
Whisk
-
Measuring cups and spoons
-
Chef’s knife and cutting board
Ingredients
For the Strawberry Layer:
-
1 lb (450g) fresh strawberries, hulled and sliced
-
3 tablespoons granulated sugar
-
1 teaspoon fresh lemon juice
For the No-Bake Cheesecake Pudding Filling:
-
1 (8 oz) block full-fat cream cheese, softened to room temperature
-
1 (3.4 oz) box instant vanilla pudding mix
-
½ cup (100g) granulated sugar
-
2 cups (480ml) cold whole milk
-
1 teaspoon pure vanilla extract
-
1 (8 oz) container frozen whipped topping (Cool Whip), thawed (or see fresh whip alternative below)
For the Whipped Cream Topping:
-
1 cup (240ml) heavy cream, cold
-
2 tablespoons powdered sugar
-
½ teaspoon pure vanilla extract
For Assembly:
-
1 (11 oz) box vanilla wafer cookies (like Nilla Wafers)
-
4-5 medium ripe-but-firm bananas, sliced into ¼-inch rounds
-
Additional whole or sliced strawberries for garnish
-
Optional: Crushed vanilla wafers or graham cracker crumbs for garnish
Instructions
Phase 1: Macerate the Strawberries
Time: 15 minutes (plus resting) | Intensity: Low
-
In a medium bowl, combine the sliced strawberries, 3 tablespoons of granulated sugar, and the lemon juice.
-
Toss thoroughly to coat. Let the mixture sit at room temperature for at least 15-20 minutes, stirring occasionally. The strawberries will release their natural juices, creating a sweet syrup. This step is crucial for maximizing flavor.
Phase 2: Create the Cheesecake Pudding Filling
Time: 15 minutes | Intensity: Medium (with a mixer)
-
Whip the Cream Cheese: In the bowl of a stand mixer fitted with the paddle attachment (or using a hand mixer), beat the softened cream cheese and ½ cup granulated sugar on medium-high speed for 2-3 minutes, until completely smooth, creamy, and no lumps remain. Scrape down the bowl.
-
Make Pudding Base: In a separate large bowl, whisk together the cold milk and the instant vanilla pudding mix for 2 full minutes. It will begin to thicken immediately.
-
Combine: With the mixer on low, gradually add the thickened pudding mixture to the whipped cream cheese. Add the vanilla extract. Beat on medium speed until perfectly smooth and fully incorporated, about 1-2 minutes.
-
Fold in Whipped Topping: Using a rubber spatula, gently fold in the entire container of thawed whipped topping until no white streaks remain. The filling should be thick, fluffy, and uniform.
Phase 3: Prepare the Whipped Cream Topping
Time: 5 minutes | Intensity: Low (with a mixer)
-
In a clean, chilled bowl, combine the cold heavy cream, powdered sugar, and vanilla extract.
-
Using a whisk attachment on your mixer, whip on medium-high speed until medium-stiff peaks form. Be careful not to over-whip into butter. Set aside, covered, in the refrigerator.
Phase 4: Assemble the Masterpiece
Time: 15 minutes | Intensity: Low (The fun, creative part)
-
First Layer: Spread about 1 cup of the cheesecake pudding filling evenly over the bottom of your trifle dish or 9×13 pan.
-
Cookie & Fruit Layers: Arrange a single layer of vanilla wafers over the pudding. Top with a single layer of banana slices (use about 1.5 bananas per layer). Spoon half of the macerated strawberries (with their juices) evenly over the bananas.
-
Repeat: Carefully spread half of the remaining pudding filling over the fruit. Repeat the layers: wafers, bananas, the remaining macerated strawberries.
-
Final Pudding Layer: Spread the last of the pudding filling over the top as your final thick layer. Smooth the top with a spatula.
Phase 5: Chill and Set
Time: 4+ hours (Overnight is best) | Intensity: None (Refrigerator does the work)
Cover the dish tightly with plastic wrap. Refrigerate for at least 4 hours, but ideally overnight (8-12 hours). This non-negotiable step allows the wafers to soften into a cake-like texture and all the flavors to meld magnificently.
Phase 6: Garnish and Serve
Time: 5 minutes | Intensity: Low
Just before serving, spread or pipe the reserved freshly whipped cream over the entire top layer of the pudding. Garnish artistically with additional strawberry slices, whole berries, and a sprinkle of crushed vanilla wafers. Serve chilled, scooping down to get all the glorious layers in each portion.
Recipe Notes
-
The Overnight Advantage: This dessert is genuinely better the next day. The vanilla wafers transform from crisp to a soft, creamy layer that mimics cake, and the flavors become deeply unified.
-
Banana Browning: To prevent sliced bananas from browning too much before serving, you can toss them lightly with a teaspoon of lemon or pineapple juice. However, once layered and chilled in the pudding, they are protected and will brown only minimally.
-
Fresh Whipped Cream Alternative: You can substitute the entire whipped cream step by using a second 8 oz container of whipped topping for the garnish. However, the flavor and texture of real, lightly sweetened whipped cream is superior.
-
Customization: Use cheesecake-flavored instant pudding for an even stronger cheesecake note. Add a layer of lemon curd or blueberry compote for a different twist.
-
Storage: Keep covered tightly in the refrigerator for up to 3 days. The whipped cream topping is best added just before serving for optimal texture.
Nutrition Information (Per serving, approx. 1 cup)
| Nutrient | Amount |
|---|---|
| Calories | 420 |
| Total Fat | 22g |
| – Saturated Fat | 13g |
| Cholesterol | 55mg |
| Sodium | 280mg |
| Total Carbohydrate | 52g |
| – Dietary Fiber | 3g |
| – Sugars | 36g |
| Protein | 6g |
Nutritional values are approximate and can vary based on specific brands of ingredients, exact layering, and portion size. This is a rich, celebratory dessert.