Recipe Name: Pepperoni Pizza Bombs
Category: Appetizer, Snack
Cuisine: Italian-American
Prep Time: 20 minutes
Cook Time: 15-18 minutes
Total Time: 40 minutes, plus optional 5-minute rest
Serves: 4-6 people (Makes 16 bombs)
Difficulty: Easy
Intensity: Low-Medium (Involves simple assembly and baking)
Ingredients
For the Pizza Bombs:
-
1 lb (16 oz) store-bought pizza dough, at room temperature
-
4 oz (about 32 slices) pepperoni, diced
-
1 ½ cups (6 oz) low-moisture whole-milk mozzarella cheese, shredded
-
¼ cup finely grated Parmesan cheese
-
2 tablespoons pizza sauce, plus more for serving
-
1 teaspoon Italian seasoning
-
½ teaspoon garlic powder
-
All-purpose flour, for dusting
For the Garlic Butter Glaze:
-
3 tablespoons unsalted butter, melted
-
1 tablespoon olive oil
-
2 cloves garlic, minced
-
1 teaspoon fresh parsley, finely chopped (or ½ teaspoon dried)
-
Pinch of salt
For Serving:
-
1 cup warm marinara or pizza sauce
-
Extra grated Parmesan and red pepper flakes, for garnish
Equipment You’ll Need
-
Large mixing bowl
-
Baking sheet
-
Parchment paper or silicone baking mat
-
Rolling pin
-
Pizza cutter or sharp knife
-
Pastry brush
-
Small bowl for butter glaze
Step-by-Step Instructions
Step 1: Prep Your Station & Preheat
Preheat your oven to 400°F (200°C). This ensures a hot, ready environment for the bombs to puff up and turn golden beautifully. Line a standard baking sheet with parchment paper or a silicone mat. This is crucial—it prevents sticking and makes cleanup a breeze.
Lightly dust your clean work surface with flour. Bring your pizza dough, cheeses, pepperoni, and seasonings to your station for easy assembly.
Step 2: Create the Filling
In a medium bowl, combine the diced pepperoni, shredded mozzarella, grated Parmesan, 2 tablespoons of pizza sauce, Italian seasoning, and garlic powder. Mix thoroughly with a fork or your hands until everything is evenly distributed and slightly clumpy. The pizza sauce here acts as a flavorful binder, ensuring every bite is moist and packed with flavor.
Step 3: Roll and Divide the Dough
Place your room-temperature pizza dough on the floured surface. Using a rolling pin, gently roll it out into a rough rectangle, about 12×16 inches and ¼-inch thick. Don’t worry about perfect edges! Using your pizza cutter or a sharp knife, cut the dough into 16 roughly equal squares. A 4×4 grid works perfectly.
Step 4: Stuff and Assemble the Bombs
This is the fun part! Take one square of dough and gently stretch it slightly with your fingers. Place a heaping tablespoon of the pepperoni-cheese filling in the center. Imagine you are making a little dough purse.
Gather all four corners of the dough square to the top of the filling, then pinch the seams tightly together. Gently roll the sealed bundle between your palms to form a smooth, round ball. Make sure the seams are completely sealed—this is your bomb’s “armor” against cheese leakage!
Place the seam-side down on your prepared baking sheet. Repeat with the remaining dough and filling, arranging the bombs about 1 inch apart on the sheet. You should have 16 uniform balls.
Step 5: Make the Garlic Butter Glaze
While the oven finishes preheating, make the simple glaze. In a small bowl, combine the melted butter, olive oil, minced garlic, chopped parsley, and a pinch of salt. Stir well. The olive oil helps prevent the butter from burning, and the fresh garlic infuses the glaze with incredible aroma.
Step 6: Glaze and Bake
Using your pastry brush, generously brush the top and sides of each dough ball with the garlic butter mixture. Reserve about half of the glaze for after baking.
Place the baking sheet in the preheated oven. Bake for 15-18 minutes, or until the Pizza Bombs are puffed up, deep golden brown on top, and you can see cheese possibly bubbling at the seams.
Step 7: The Final Glaze and Rest
As soon as the bombs come out of the oven, immediately brush them with the remaining garlic butter glaze. This second layer adds an insane amount of flavor and gives them a gorgeous, glossy finish.
Let them rest on the baking sheet for 5 minutes. This is a critical but often skipped step! The filling is molten lava hot straight from the oven. This short rest allows the cheese to set slightly, making them safe (and more enjoyable) to eat, and helps the structure firm up.
Serving and Enjoying
Transfer your glorious Pepperoni Pizza Bombs to a serving platter. Sprinkle with a little extra Parmesan and red pepper flakes if desired. Serve immediately with a bowl of warm marinara sauce for dipping.
Pro-Tip: For a party, you can keep a batch warm in a low oven (200°F/95°C) on a wire rack to keep the bottoms crispy. They are best enjoyed fresh on the day they are made.
Nutritional Information
Please note: The following is an estimate per Pizza Bomb (1 of 16), including the garlic butter glaze. Actual values may vary based on specific ingredients used.
-
Calories: ~180 kcal
-
Total Fat: 11g
-
Saturated Fat: 5g
-
Cholesterol: 25mg
-
Sodium: 380mg
-
Total Carbohydrates: 14g
-
Dietary Fiber: <1g
-
Sugars: 1g
-
Protein: 6g
The Last Bite
Pepperoni Pizza Bombs are more than just a recipe; they’re an experience. They transform the communal act of sharing a pizza into a personal, handheld delight. The contrast of the soft, buttery, garlicky bread with the savory, molten cheese and spicy pepperoni inside is nothing short of magical. They require no fancy skills, just a love for good food and a few minutes of playful assembly.
So next time the crowd is hungry and the game is on, skip the delivery call and make a batch of these explosive little wonders. Watch them vanish, listen for the cheers, and get ready to share the recipe—because everyone will ask for it.
Of course! Here is a 1,000-word recipe for a stunningly easy and delicious Strawberry Cheesecake Dump Cake, crafted for a website with all the requested details.
Strawberry Cheesecake Dump Cake: The Viral Sensation You Need to Bake
If you’ve scrolled through social media lately, you’ve likely seen it: the magical, almost-too-easy dessert that promises the rich, creamy flavor of cheesecake and the sweet, jammy burst of strawberries, all with the comforting texture of a cake, and all without any fuss. This is the Strawberry Cheesecake Dump Cake, and it lives up to every bit of its viral hype. It’s the dessert that bridges the gap between “I can’t bake” and “I’m a kitchen hero,” delivering incredible results with minimal effort.
The beauty of a dump cake lies in its glorious, no-pretense method. You literally “dump” layers of ingredients into a pan, and the oven works its transformative magic. A buttery, golden, crumbly topping forms over a luscious, self-creaming filling that separates into distinct layers of fruity, cheesy perfection. It’s part cake, part cobbler, and entirely irresistible. Whether you need a last-minute potluck superstar, a comforting family treat, or just want to understand what the internet is raving about, this recipe is your ticket.
Recipe Name: Viral Strawberry Cheesecake Dump Cake
Category: Dessert
Cuisine: American
Prep Time: 10 minutes
Cook Time: 45-50 minutes
Cooling Time: 1-2 hours (minimum)
Total Time: ~1 hour active, plus cooling
Serves: 9-12 people
Difficulty: Extremely Easy
Intensity: Very Low (No mixing bowls, no electric mixer, just assembling)
Ingredients
For the Filling & Cream Cheese Layer:
-
2 (21 oz) cans strawberry pie filling (NOT pure fruit or sauce)
-
1 teaspoon pure vanilla extract
-
1 (8 oz) block full-fat cream cheese, cold and cut into ~½-inch cubes
-
2 tablespoons granulated sugar
For the Cake & Topping Layer:
-
1 (15.25 oz) box classic yellow cake mix (DO NOT prepare as directed on box)
-
1 cup (2 sticks / 226g) unsalted butter, thinly sliced
-
½ cup sliced almonds or chopped pecans (optional, for crunch)
Essential Equipment:
-
9×13 inch metal or glass baking dish
-
No mixer or bowls required!
The Science of the “Dump”: Understanding the Magic
Before we begin, know this: the simplicity is intentional and brilliant. The cold cream cheese cubes will soften and bake into distinct, creamy pockets. The dry cake mix, when combined with the melting butter and moisture from the filling, creates a craggy, crisp, and tender topping that is the hallmark of a perfect dump cake. Using cold butter and cold cream cheese is a pro-tip—it slows melting, preventing the layers from merging into a homogenous mass and giving you that perfect textured finish.
Step-by-Step Visual Instructions
Step 1: Prep & Preheat
Position a rack in the center of your oven and preheat it to 350°F (175°C). No need to grease the baking dish. The high butter and sugar content in the recipe prevents sticking beautifully.
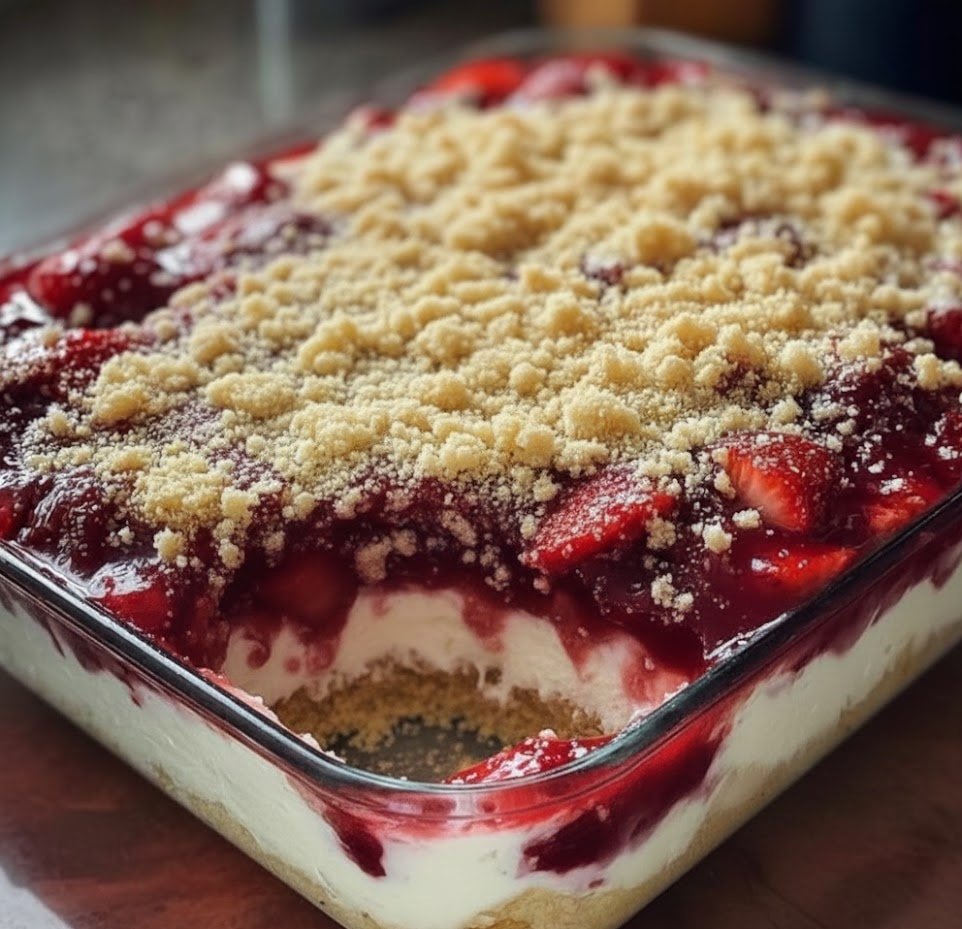
Step 2: The First Dump – Strawberry Base
Open your cans of strawberry pie filling. Pour both cans directly into the bottom of the 9×13 dish. Use a rubber spatula to spread it into a relatively even layer. Drizzle the vanilla extract evenly over the strawberries. This base layer provides the fruity, jammy soul of the dessert and the primary moisture for the topping.
Step 3: The Second Layer – Cream Cheese “Bombs”
Take your cold, cubed cream cheese and scatter the pieces evenly over the strawberry layer. You’re aiming for distribution, not perfection. Sprinkle the 2 tablespoons of granulated sugar evenly over the cream cheese cubes. This little bit of sugar will sweeten the cream cheese directly and aid in browning.
Step 4: The Third Dump – Dry Cake Mix
Open your box of dry yellow cake mix. Sprinkle the entire contents evenly over the cream cheese and strawberry layers. Use your fingers to break up any large clumps of mix. This is crucial: DO NOT STIR. The layers must remain distinct. The cake mix powder is your dry ingredient that will become the topping.
Step 5: The Final Layer – Butter Blanket
Take your thinly sliced cold butter. Arrange the slices evenly over the entire surface of the dry cake mix, aiming to cover as much area as possible. This is what creates the iconic “craggy top.” As the butter melts in the oven, it will moisten the cake mix, causing it to bake into buttery clumps and crumbles. If using, sprinkle the nuts evenly over the butter.
Baking to Perfection
Place the dish in the preheated oven on the center rack. Bake for 45-50 minutes. The cake is done when the top is deep golden brown, the butter is fully melted and bubbled around the edges, and the strawberry filling is visibly bubbling vigorously at the sides. The center may look slightly soft, but it will set as it cools.
The Critical Rest: Patience is a Flavor
This is the hardest but most important step. You MUST let the dump cake cool for at least 1-2 hours before serving. It needs this time for the bubbling, lava-hot fruit filling to thicken and set, and for the cream cheese layers to firm up. Serving it too hot will result in a soupy, though still tasty, mess. For ideal slicing, let it cool almost completely. It can be served warm, at room temperature, or chilled.
Serving & Presentation
Once cooled, scoop out generous portions into bowls. While sublime on its own, these elevators make it restaurant-worthy:
-
A la Mode: A scoop of vanilla ice cream is non-negotiable for many. The hot/cold contrast is divine.
-
Fresh Contrast: Top with freshly whipped cream and a scatter of diced fresh strawberries.
-
Extra Decadence: Drizzle with a store-bought caramel or chocolate sauce.
-
For Gatherings: Serve it right from the dish with a large spoon—its rustic, inviting appearance is part of the charm.
Nutritional Information
Please note: The following is an estimate per serving (based on 12 servings), calculated using the full butter amount and without optional nuts or ice cream. Actual values may vary based on specific brands used.
-
Calories: ~480 kcal
-
Total Fat: 23g
-
Saturated Fat: 13g
-
Cholesterol: 60mg
-
Sodium: 380mg
-
Total Carbohydrates: 68g
-
Dietary Fiber: 2g
-
Sugars: 45g
-
Protein: 3g
Why It’s Viral & The Last Bite:
The Strawberry Cheesecake Dump Cake resonates because it delivers maximum joy with minimum effort. In a world of complex baking shows and intricate recipes, it’s a liberating reminder that delicious doesn’t have to be difficult. It’s a lesson in trusting the process—the alchemy that happens in your oven when you combine simple, pantry-ready ingredients with heat and time.