-
Prep Time: 30 minutes (active)
-
Resting/Rising Time: 12-18 hours
-
Cook Time: 45 minutes
-
Total Time: 13 to 19 hours (mostly hands-off)
-
Skill Level: Beginner to Intermediate
-
Yield: 1 large loaf
-
Recipe Category: Bread, Side Dish
-
Recipe Cuisine: Artisan Baking
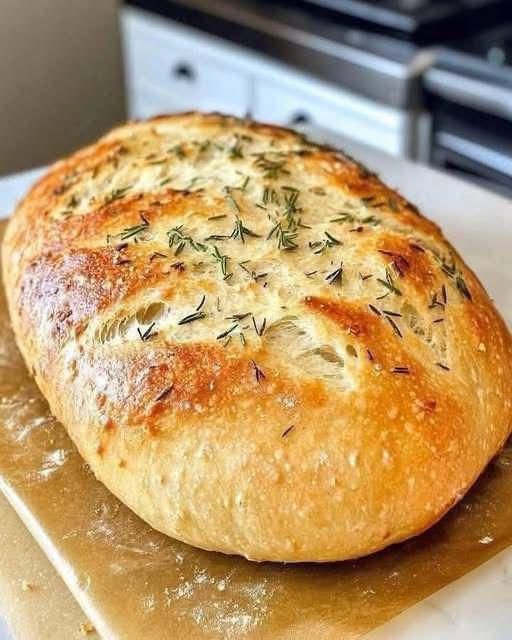
There is a common misconception that creating a beautiful, crusty, flavor-packed sourdough bread is a Herculean task reserved for expert bakers. This recipe for Sourdough No-Knead Garlic Bread shatters that myth. It leverages the slow, natural power of a sourdough starter and the simple science of a long, cold fermentation to create a loaf that looks and tastes like it came from a professional bakery, all with an almost negligible amount of active effort. The “no-knead” method relies on time, rather than muscle, to develop the gluten network, resulting in an incredibly open and airy crumb that is the holy grail for bread enthusiasts.
This bread is a celebration of deep, complex flavors. The natural tang of the sourdough is the perfect backdrop for the sweet, mellow essence of roasted garlic and the earthy fragrance of fresh rosemary, which are folded directly into the dough. As it bakes in a preheated Dutch oven, the crust becomes shatteringly crisp and beautifully blistered, while the interior steams itself to a soft, chewy perfection. The process requires patience more than skill, making it the perfect project for a lazy weekend or for anyone looking to dive into the world of sourdough without intimidation. The result is not just garlic bread; it’s a transformative culinary experience.
Ingredients
For the Main Dough:
-
3 ½ cups (435g) bread flour
-
1 ½ cups (350ml) lukewarm water
-
½ cup (120g) active sourdough starter (100% hydration)
-
1 ½ teaspoons (8g) fine sea salt
For the Garlic-Herb Infusion:
-
1 whole head of garlic
-
1 tablespoon olive oil, plus extra for drizzling
-
2 tablespoons fresh rosemary, finely chopped (or 1 tbsp thyme)
-
½ teaspoon flaky sea salt (like Maldon), for finishing
-
Optional: 2 tablespoons grated Parmesan cheese for topping
Instructions
Step 1: The Long Autolyse and Mix (Day 1)
-
Roast the Garlic: Begin by preparing the garlic. Preheat your oven to 400°F (200°C). Slice the top off the head of garlic to expose the cloves, place it on a piece of foil, drizzle with olive oil, and wrap tightly. Roast for 30-40 minutes until the cloves are soft, golden, and easily squeezed out. Let cool, then squeeze the soft roasted garlic into a small bowl. Mash it with a fork and mix in the chopped fresh rosemary. Set aside.
-
Combine Dough Ingredients: In a large mixing bowl, whisk together the bread flour and salt. In a separate jug, combine the lukewarm water and active sourdough starter, stirring until the starter is mostly dissolved.
-
Create the Shaggy Dough: Pour the wet ingredients into the dry ingredients. Use a sturdy spatula or your hands to mix until there are no dry patches of flour left. The dough will be shaggy, sticky, and quite rough. This is exactly what you want. Do not knead it.
-
Incorporate the Flavor: Let the dough rest, covered with a damp kitchen towel or plastic wrap, for 30 minutes. This rest period, called the autolyse, allows the flour to fully hydrate, making the next step easier. After 30 minutes, add the mashed roasted garlic and rosemary mixture. Wet your hand to prevent sticking, and gently fold and pinch the dough until the garlic and herbs are evenly distributed.
Step 2: The Bulk Fermentation (The Hands-Off Rise)
-
The Folding Method: Cover the bowl tightly with plastic wrap or a lid. Let the dough rest at room temperature (ideally 70-75°F or 21-24°C) for 8-12 hours. During the first 2 hours of this rise, perform a series of “stretch and folds.” Every 30 minutes, wet your hand, reach under one side of the dough, stretch it up, and fold it over the center. Repeat this for all four “sides” of the dough. This gentle process builds strength without kneading. After 2 hours and 4 sets of folds, simply let the dough rest, covered, for the remainder of the bulk fermentation.
-
Check for Readiness: The dough is ready when it has increased in volume by about 50-75%, is covered with small bubbles on the surface, and has a domed, slightly jiggly appearance.
Step 3: Shape and Final Proof
-
Pre-Shape and Bench Rest: Generously flour a work surface and your hands. Gently tip the dough out onto the surface. Without deflating it too much, fold the edges into the center to create a rough ball. Let it rest for 20-30 minutes, uncovered. This bench rest relaxes the gluten.
-
Final Shaping: Lightly flour the top of the dough. Using a bench scraper, gently flip it over so the floured side is down. Pull the bottom edge up to the center, then the left and right sides, and finally the top, creating a tight surface. Flip the entire loaf over so the seam side is down.
-
Prepare the Proofing Basket: Generously flour a proofing basket (banneton) or a medium-sized bowl lined with a floured kitchen towel (use rice flour if you have it to prevent sticking).
-
Cold Proof: Place the shaped loaf, seam-side up, into the prepared basket. Cover it with a plastic bag or shower cap and place it in the refrigerator for a minimum of 4 hours, or up to 18 hours. This cold proof develops incredible flavor and makes the dough easier to score.
Step 4: Bake to Perfection (Day 2)
-
Preheat with the Dutch Oven: At least 30 minutes before you’re ready to bake, place your empty Dutch oven (with the lid on) into your oven and preheat it to 450°F (230°C).
-
Score the Dough: Carefully remove the hot Dutch oven from the oven and take off the lid. Take your cold dough from the fridge. Turn it out onto a piece of parchment paper (the seam side is now down). Using a sharp razor blade (lame) or a very sharp knife, make one confident, deep slash down the center of the loaf. This “score” allows the steam to escape and the bread to expand beautifully in the oven.
-
Bake Covered: Using the parchment paper as a sling, carefully lower the dough into the scorching hot Dutch oven. Put the lid back on and place it in the oven.
-
Create Steam and Finish: Bake with the lid on for 30 minutes. This traps the steam from the dough, creating a crispy crust. After 30 minutes, remove the lid. The loaf will be pale but well-risen. At this point, you can sprinkle the top with flaky sea salt and optional Parmesan cheese.
-
Final Bake: Bake for another 15-20 minutes with the lid off, until the crust is a deep, glorious golden brown and the internal temperature reaches 208-210°F (98-99°C).
Step 5: The Crucial Cool Down
-
Cool Completely: This is the most difficult but most important step. Transfer the bread to a wire cooling rack immediately. You must let the loaf cool completely for at least 2-3 hours before slicing. Cutting into a hot loaf stops the cooking process and releases all the steam, resulting in a gummy, dense crumb. The wait is essential for the perfect texture.
Step 6: Serving Your Masterpiece
-
Use a serrated bread knife to slice the cooled loaf. Marvel at the open, airy crumb and the beautiful distribution of roasted garlic and herbs.
-
Serve as is, or toast slices and slather with high-quality butter. It is the ultimate accompaniment to pasta, soups, stews, or a simple salad.
Notes
-
Starter Readiness: Your sourdough starter should be “active” and recently fed (peaked or just past its peak) for the best rise and flavor.
-
No Dutch Oven? You can create a steamy environment by placing a pan of boiling water on the bottom rack of your oven and baking the loaf on a preheated pizza stone or baking sheet.
-
Flavor Variations: Add ½ cup of grated sharp cheddar cheese with the garlic, or substitute the rosemary with thyme and a teaspoon of lemon zest.
-
Storage: Store the completely cooled bread in a paper bag at room temperature for 2-3 days. For longer storage, slice and freeze in a freezer bag for up to 3 months. Reheat from frozen in a toaster or oven.
Nutrition Information (Per Slice, based on 12 slices)
-
Calories: ~150
-
Total Fat: 1.5g
-
Saturated Fat: 0.2g
-
Cholesterol: 0mg
-
Sodium: 300mg
-
Total Carbohydrates: 30g
-
Dietary Fiber: 1g
-
Sugars: 0.5g
-
Protein: 5g
Please note: Nutritional information is an estimate and can vary based on specific ingredients used.