-
Name: Butterfinger Balls
-
Prep Time: 30 minutes
-
Cook Time: 5 minutes (for melting chocolate)
-
Chill Time: 45 minutes
-
Total Time: 1 hour 20 minutes
-
Course: Dessert, Candy
-
Cuisine: American
-
Difficulty: Easy
-
Yield: 24-30 balls
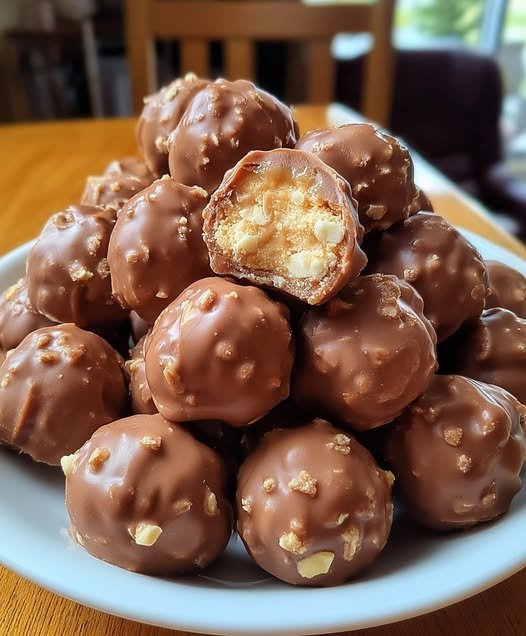
Few candy bars have a texture and flavor as iconic as the Butterfinger. That unique, layered crispity-crunchety center with its distinct peanut butter flavor, all enrobed in a layer of rich chocolate, is instantly recognizable. What if you could capture that magic in a simple, no-bake treat you can make at home? With this recipe for Butterfinger Balls, you can.
These delightful bite-sized morsels are a revelation. They require no special equipment, no baking, and just four simple ingredients to create a shockingly accurate copycat of the famous candy. The process is fun, fast, and perfect for getting kids involved in the kitchen. Whether you’re making them for a holiday platter, packaging them up as homemade gifts, or just satisfying a specific candy craving, these Butterfinger Balls are guaranteed to be a massive hit. They deliver that perfect combination of sweet, salty, crispy, and chocolatey in every single bite.
Butterfinger Balls
Ingredients
For the Candy Center:
-
1 (10 oz) bag of candy corn
-
1 (16 oz) jar of creamy peanut butter (not natural or oily)
-
1 cup (about 4-5 sheets) finely crushed graham crackers
For the Chocolate Coating:
-
12 oz (2 cups) semi-sweet chocolate chips
-
1 tablespoon coconut oil (or vegetable shortening)
Equipment
-
Medium microwave-safe bowl
-
Large mixing bowl
-
Baking sheets
-
Parchment paper or wax paper
-
Fork or dipping tools
-
Food processor or zip-top bag and rolling pin
Instructions
Step 1: Create the “Crispy” Layers
The secret to the authentic Butterfinger texture lies in the combination of candy corn and peanut butter. When melted together, they create a pliable, sweet, and peanutty base that hardens into a flaky, crispy texture.
-
Place the entire bag of candy corn into a medium microwave-safe bowl.
-
Microwave in 30-second intervals, stirring well between each, until the candy corn is completely melted and smooth. This usually takes about 1 to 1.5 minutes total. Be careful not to overheat.
-
Immediately add the entire jar of creamy peanut butter to the melted candy corn. Stir vigorously until the two are completely combined into a smooth, homogenous mixture. It will be thick and glossy.
Step 2: Add the Graham Cracker Crunch
-
While the peanut butter and candy corn mixture is still warm, add the finely crushed graham crackers to the bowl.
-
Stir until the graham cracker crumbs are fully incorporated. The mixture will be very thick and may be slightly difficult to stir—this is normal and means you’re on the right track.
-
Let the mixture cool on the counter for 15-20 minutes, or until it is cool enough to handle comfortably. You can speed this up by placing the bowl in the refrigerator for 10 minutes.
Step 3: Form the Balls
-
Line a baking sheet with parchment paper or wax paper.
-
Using a small cookie scoop (about 1 tablespoon in size) or a heaping teaspoon, portion out the mixture.
-
Roll each portion between your palms to form a smooth, compact ball. If the mixture is too sticky, lightly dampen your hands with water.
-
Place the formed balls on the prepared baking sheet.
-
Once all balls are formed, place the entire baking sheet in the refrigerator for at least 30 minutes to chill and firm up. This step is crucial for ensuring the balls don’t fall apart when you dip them in the warm chocolate.
Step 4: Coat in Chocolate
-
Combine the chocolate chips and coconut oil in a clean, microwave-safe bowl. The coconut oil is a pro-trick; it thins the chocolate just enough to create a smooth, thin, shell-like coating that sets beautifully.
-
Microwave in 20-second intervals, stirring thoroughly each time, until the chocolate is completely melted and smooth.
-
Remove the chilled Butterfinger balls from the refrigerator. Using a fork or a dipping tool, dip each ball into the melted chocolate, ensuring it’s completely covered.
-
Tap the fork gently on the side of the bowl to allow the excess chocolate to drip off.
-
Return the coated ball to the parchment-lined baking sheet. If desired, you can add a small sprinkle of crushed graham cracker or sea salt on top for decoration before the chocolate sets.
-
Repeat with all remaining balls.
Step 5: Set and Serve
Once all the balls are coated, return the baking sheet to the refrigerator for about 15 minutes, or until the chocolate coating is completely firm.
Once set, the Butterfinger Balls are ready to enjoy! Store them in an airtight container in the refrigerator.
Baker’s Notes & Tips for Success
-
Peanut Butter is Key: For the best texture and flavor, use a standard, shelf-stable creamy peanut butter like Jif or Skippy. Natural peanut butters (the kind that separate) will make the mixture too oily and prevent it from setting correctly.
-
The Crushing Technique: For the finest, most authentic texture, use a food processor to crush the graham crackers into a near-powder. If you don’t have one, place the sheets in a zip-top bag and use a rolling pin to crush them as finely as possible.
-
Don’t Rush the Chill: The chilling steps are what make this no-bake recipe work. A firm, cold center is essential for a clean dip and the perfect final texture. If the centers are too warm, they can soften the chocolate coating or cause the ball to slump.
-
Troubleshooting Sticky Mixture: If the peanut butter mixture is too sticky to roll even after cooling, you can add a few more tablespoons of graham cracker crumbs until it reaches a workable consistency.
-
Storage: Store these in an airtight container in the refrigerator for up to 2 weeks. They can also be frozen for up to 3 months. The cold refrigerator environment helps maintain their perfect crispy texture.
Serving Suggestions & Variations
-
The Classic: Enjoy them straight from the fridge for the most authentic Butterfinger experience.
-
Gift Giving: Package these in a decorative box or cellophane bag tied with a ribbon for a thoughtful and delicious homemade gift.
-
Dessert Platter: Add them to a holiday cookie tray for a standout no-bake option.
-
Flavor Twist: Use white chocolate or dark chocolate chips for the coating for a different flavor profile.
-
Add Crunch: Roll the finished, chocolate-dipped balls in additional crushed graham crackers or even finely chopped peanuts for extra texture.
Nutrition Information
(Please note: The following is an estimate and can vary based on specific ingredients and brands used, and the size of the balls. Values are approximate per ball, assuming a yield of 28.)
Serving Size: 1 ball | Calories: 195 | Total Fat: 11g | Saturated Fat: 4g | Trans Fat: 0g | Cholesterol: 0mg | Sodium: 85mg | Total Carbohydrates: 23g | Dietary Fiber: 1g | Sugars: 18g | Protein: 4g
A Note on Nutrition: Butterfinger Balls are a decadent, sweet treat. They are energy-dense, deriving most of their calories from sugars (from the candy corn and chocolate) and fats (from the peanut butter and chocolate). The peanut butter does provide a small amount of protein. Due to the high sugar content, these are best enjoyed in moderation as an occasional indulgence. Making them at home allows you to control the portion size, which is a great way to manage intake while still satisfying a candy craving.
These Butterfinger Balls are more than just a recipe; they’re a fun kitchen experiment with a deliciously rewarding outcome. They prove that with a few simple ingredients and a little patience, you can recreate a beloved candy bar right in your own kitchen. So, gather your supplies and get ready to impress everyone with your homemade candy-making skills