Active Time: 45 minutes
Hands-Off Time: 14-18 hours (including fermentation)
Baking Time: 45 minutes
Total Time: 15-18.5 hours
Difficulty: Intermediate (Requires an active sourdough starter)
Intensity: Medium-Handling, requiring patience for fermentation and caramelization.
Ingredients
For the Caramelized Onions:
-
2 large yellow onions (about 500g), thinly sliced
-
2 tablespoons unsalted butter
-
1 tablespoon olive oil
-
1/4 teaspoon salt
-
1 tablespoon dry sherry or white wine (optional)
-
1/2 teaspoon fresh thyme leaves
For the Sourdough:
-
150g (2/3 cup) active, bubbly sourdough starter (100% hydration)
-
375g (1 ½ cups + 1 tbsp) lukewarm water
-
500g (4 cups + 2 tbsp) bread flour
-
10g (1 ¾ tsp) fine sea salt
-
Rice flour, for dusting
Instructions
Day 1: Evening Prep & Caramelization
1. Caramelize the Onions (Time: 45 minutes, Low & Slow Intensity):
In a large skillet or Dutch oven, melt the butter and olive oil over medium-low heat. Add the sliced onions and salt. Cook, stirring occasionally, for 30-45 minutes until the onions are deeply golden brown, jammy, and reduced significantly. If they begin to stick, add a splash of water. In the final 5 minutes, add the sherry (if using) and thyme, cooking until the liquid evaporates. Spread onions on a plate and refrigerate uncovered until completely cool.
2. Autolyse & Mix (Time: 30 minutes hands-off, Low Intensity):
In a large bowl, combine the bread flour and 350g of the lukewarm water. Mix until no dry flour remains. Cover and let rest (autolyse) for 30 minutes. This hydrates the flour and develops initial gluten.
3. Incorporate Starter & Salt (Time: 10 minutes, Medium Intensity):
Add the active sourdough starter to the dough. Using wet hands, pinch and fold the mixture until the starter is fully integrated—this will be messy but persist for 3-4 minutes. Let rest, covered, for 20 minutes.
Add the salt and the remaining 25g of water. Squeeze and fold to fully dissolve and incorporate the salt.
Day 1: Nighttime Bulk Fermentation
4. Bulk Fermentation & Folds (Hands-On: 15 minutes; Hands-Off: 4-6 hours, Passive Intensity):
Over the next 4-6 hours (time depends on your kitchen’s temperature, ideally 75°F/24°C), you will perform a series of “stretch and folds” to build dough strength.
* First 2 hours: Perform 3-4 sets of stretch and folds, spaced 30 minutes apart. Wet your hands, grab one side of the dough, stretch it upward, and fold it over the center. Repeat around the bowl. The dough will transform from shaggy to smooth and strong.
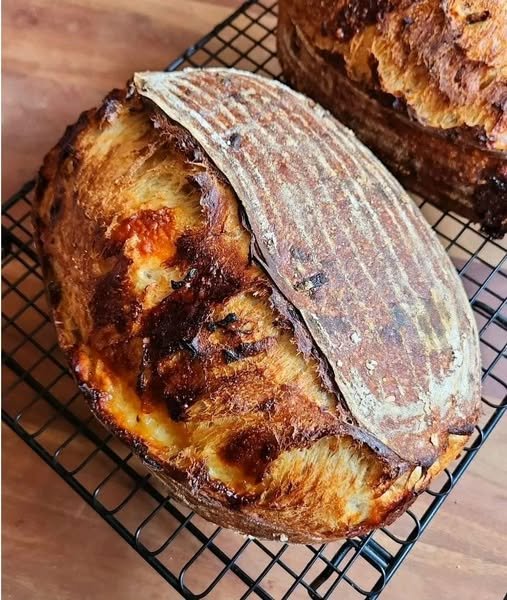
* Add Onions: During the 2nd or 3rd fold, gently spread the cooled onions over the dough and incorporate them by folding. Be gentle to avoid crushing the dough’s structure.
* Final Rest: After the last fold, let the dough rest, covered, for the remainder of bulk fermentation. It should look puffy, have bubbles along the sides, and increase in volume by about 50%.
Day 2: Shaping, Final Proof & Baking
5. Shape & Cold Proof (Active: 20 minutes; Hands-Off: 10-14 hours, Low Intensity):
Gently turn the dough onto a lightly floured surface. Shape into a tight round (boule) or oval (batard) by folding the edges to the center and creating surface tension. Place seam-side up in a proofing basket (banneton) generously dusted with rice flour. Cover with a reusable bag or damp tea towel and place immediately in the refrigerator for 10-14 hours (overnight).
6. Preheat & Score (Time: 1 hour hands-off, 5 minutes active, High-Heat Intensity):
Place a Dutch oven with its lid into your oven. Preheat to 450°F (230°C) for at least 45 minutes. Carefully remove the cold dough from the fridge. Place a sheet of parchment paper over the banneton, flip it over, and let the dough drop gently onto the paper. Using a sharp lame or razor blade, score the top with one deep, decisive cut or a decorative pattern—this controls expansion.
7. Bake (Time: 45 minutes, High-Heat Intensity):
With Steam: Carefully transfer the dough (using the parchment as a sling) into the screaming-hot Dutch oven. Cover with the lid and bake for 25 minutes. This creates a steamy environment for optimal oven spring and crust development.
Without Steam: Remove the lid. The loaf should be pale and puffed. Reduce oven to 425°F (220°C) and bake uncovered for 20-25 minutes, until the crust is a deep, burnished amber and sounds hollow when tapped.
8. Cool (Time: 2+ hours, Essential Passive Step):
Transfer the loaf to a wire cooling rack. Resist all temptation to cut it. The bread is still cooking internally. Let it cool completely for at least 2 hours for the crumb to set properly.
Nutrition Information
(Per serving, based on 16 slices per loaf)
-
Calories: ~155 kcal
-
Total Fat: 2g
-
Saturated Fat: 1g
-
Cholesterol: 3mg
-
Sodium: 245mg
-
Total Carbohydrates: 30g
-
Dietary Fiber: 1.5g
-
Sugars: 1g (from natural onion sugars)
-
Protein: 5g
Note: Nutritional information is an estimate calculated using standard ingredients and can vary based on specific products used. The fermentation process may increase bioavailability of nutrients and lower the bread’s glycemic index compared to commercial bread.
Chef’s Notes & Storage
The Last Slice: This loaf only improves with flavor over the first 24 hours. The tang of the sourdough and the sweet-savory onion meld into something truly special by the second day.
Storage: Keep the cooled loaf in a paper bag at room temperature for 2-3 days for best texture. For longer storage, slice and freeze in an airtight bag for up to 3 months. Refresh slices in a toaster directly from frozen.
Success Tips: The key variables are fermentation time (watch the dough, not the clock) and onion moisture (ensure they are completely cool and not wet). A proper cold proof is non-negotiable for flavor and oven spring. This recipe is a labor of love, and each slice rewards the patience invested.