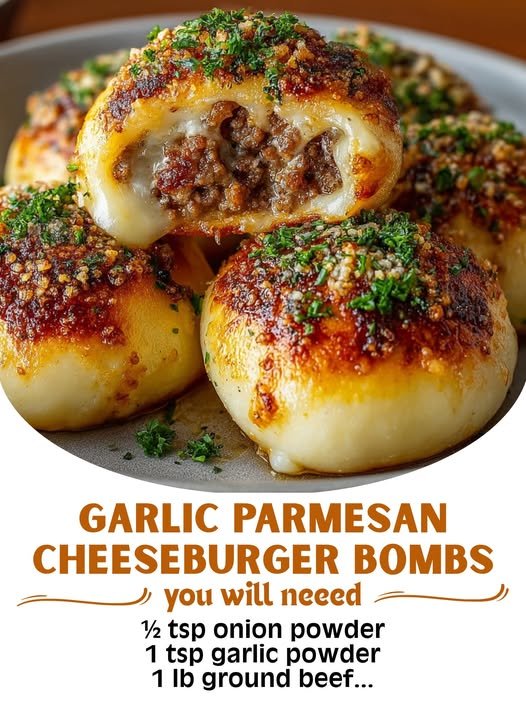
Name: Garlic Parmesan Cheeseburger Bombs
Total Time: 50 minutes
Active Time: 25 minutes
Difficulty: Easy
Servings: 12 bombs
Imagine the soul-satisfying essence of a perfectly seasoned, juicy cheeseburger—but wrapped in a warm, buttery, garlic-Parmesan biscuit and served as a dippable, popable, utterly irresistible appetizer or fun meal. That’s the magic of Garlic Parmesan Cheeseburger Bombs. This recipe transforms simple ground beef, melty cheese, and canned biscuit dough into golden, savory parcels of joy. A generous brush of garlic-Parmesan butter post-bake ensures every bite is infused with rich, aromatic flavor. They’re the ultimate crowd-pleaser for game day, parties, or a whimsical family dinner, guaranteed to disappear the moment they hit the plate.
Ingredients
For the Burger Filling:
-
1 pound lean ground beef (85/15 or 90/10 works well)
-
½ medium yellow onion, finely diced
-
2 cloves garlic, minced
-
1 teaspoon Worcestershire sauce
-
1 teaspoon yellow mustard
-
½ teaspoon smoked paprika
-
½ teaspoon kosher salt
-
¼ teaspoon freshly ground black pepper
-
4 slices (about 4 oz) American cheese, torn into small pieces (or 1 cup shredded cheddar)
For the Bombs & Garlic Butter Topping:
-
2 (16.3 oz) cans refrigerated “Grands!” style flaky biscuit dough (8 biscuits total)
-
¼ cup (½ stick) unsalted butter, melted
-
3 tablespoons freshly grated Parmesan cheese
-
1 ½ teaspoons garlic powder
-
1 teaspoon dried parsley flakes
-
Flaky sea salt, for garnish (optional)
For Serving (Optional):
-
Marinara sauce, for dipping
-
Ranch dressing, for dipping
-
Thousand Island dressing or burger sauce, for dipping
-
Additional grated Parmesan cheese
Equipment
-
12-cup standard muffin tin
-
Large skillet
-
Mixing bowls (medium, small)
-
Pastry brush or spoon
-
Box grater (if using block cheese)
-
Measuring spoons
Instructions
Part 1: Cook the Burger Filling (15 minutes)
The goal is a flavorful, moist, but not wet, filling.
-
Brown the Beef: In a large skillet over medium-high heat, cook the ground beef and diced onion together, breaking up the meat with a spoon or spatula. Cook until the beef is no longer pink and the onion is softened, about 7-8 minutes. In the last minute, add the minced garlic and cook until fragrant.
-
Season & Dry: Drain any excess fat from the skillet. Reduce heat to low. Add the Worcestershire sauce, mustard, smoked paprika, kosher salt, and black pepper. Stir to combine thoroughly and cook for another minute. Transfer the mixture to a medium bowl and let it cool for 5-10 minutes. It’s crucial the filling is cool enough to handle.
-
Add the Cheese: Once cooled slightly, fold in the torn American cheese or shredded cheddar until evenly distributed.
Part 2: Assemble the Bombs (10 minutes)
Assembly is quick and fun—perfect for helpers.
-
Prep Dough & Pan: Preheat your oven to 375°F (190°C). Lightly grease the cups of a 12-cup muffin tin. Open the biscuit cans and separate the dough. Using your fingers, gently stretch and flatten each biscuit into a 4-5 inch round. The center should be slightly thicker than the edges to prevent breaking.
-
Fill and Seal: Place about 3 tablespoons of the cooled burger-cheese mixture into the center of each flattened biscuit. Gather the edges of the dough up and over the filling, pinching them firmly at the top to seal completely. There should be no gaps or holes. Place each sealed bomb, seam-side-down, into a prepared muffin cup.
Part 3: Bake & Glaze (25 minutes)
This is where the transformation happens.
-
First Bake: Place the muffin tin in the preheated oven and bake for 18-20 minutes, or until the tops of the bombs are deeply golden brown. The dough should be cooked through.
-
Prepare Garlic-Parmesan Butter: While the bombs bake, prepare the garlic butter. In a small bowl, combine the melted butter, grated Parmesan, garlic powder, and dried parsley. Stir well.
-
The Flavor Bomb Finish: As soon as you remove the muffin tin from the oven, immediately brush or spoon the garlic-Parmesan butter generously over the top of each hot bomb. The heat will help the butter soak in slightly and activate the garlic powder’s aroma. Sprinkle with a tiny pinch of flaky sea salt, if desired.
-
Cool and Release: Let the bombs cool in the muffin tin for 5 minutes. This allows the cheese inside to set slightly, making them less molten and easier to handle. Then, carefully run a butter knife around the edges and lift each bomb out onto a serving platter.
Chef’s Notes & Tips
-
Dough Wisdom: Using the larger “Grands!” flaky-style biscuits is key. They provide enough dough to wrap the filling securely. Do not use the smaller, thinner biscuits.
-
Cheese Choice: American cheese melts into an ultra-creamy, cohesive filling. For a sharper flavor, a mix of cheddar and a slice of American gives you both melt and tang. Avoid pre-shredded cheese with anti-caking agents, as it doesn’t melt as smoothly.
-
Don’t Skip the Drain: Draining excess fat from the cooked beef is essential. A wet filling will steam and make the dough soggy.
-
Make-Ahead Magic: You can prepare the filling a day ahead and store it covered in the refrigerator. Assemble the bombs cold, and you may need to add 1-2 minutes to the bake time.
-
Variation Station: Add finely diced pickles to the filling, swap the beef for ground turkey or Italian sausage, or tuck a small cube of pepper jack cheese into the center of each bomb for a spicy surprise.
Nutrition Information (Per Bomb)
-
Calories: ~320 kcal
-
Total Fat: 19g
-
Saturated Fat: 8g
-
-
Cholesterol: 45mg
-
Sodium: 720mg
-
Total Carbohydrates: 24g
-
Dietary Fiber: 1g
-
Sugars: 4g
-
-
Protein: 14g
Note: Nutritional information is an estimate based on specific brands and may vary, particularly depending on the leanness of the beef and exact biscuit dough used. The sodium content is significant due to the seasoned beef, cheese, and biscuit dough. For a lower-sodium version, use low-sodium cheese, reduce added salt in the beef, and seek out a lower-sodium biscuit option. The richness comes from the combination of beef, cheese, butter, and biscuit dough, creating the indulgent, comforting texture that defines this fun recipe.